Cortex XSOAR 6.1 - Multi tenancy set up
- Hiep Nguyen

- Mar 15, 2021
- 3 min read
Updated: Mar 18, 2021
In multi-tenancy deployment, there are some terms that we need to clarify:

- Master: it sit on the XSOAR app server literally. From Master account, you can manage all your multi-tenancy deployment, including host and tenant.
- Host: is one or multiple servers deployed at end customer side.
For example, if you are a MSSP and you have 3 managed customers at 3 different locations, you will need to install at least 1 Host server at each customer’s location.
In another scenario, if you manage 3 customers in your location, you can just install 1 Host (2 for high availability) and create 3 tenants on that host only.
- Tenant: is a virtual unit that define perimeter between managed customer. Tenant is created on each Host or HA group of hosts.
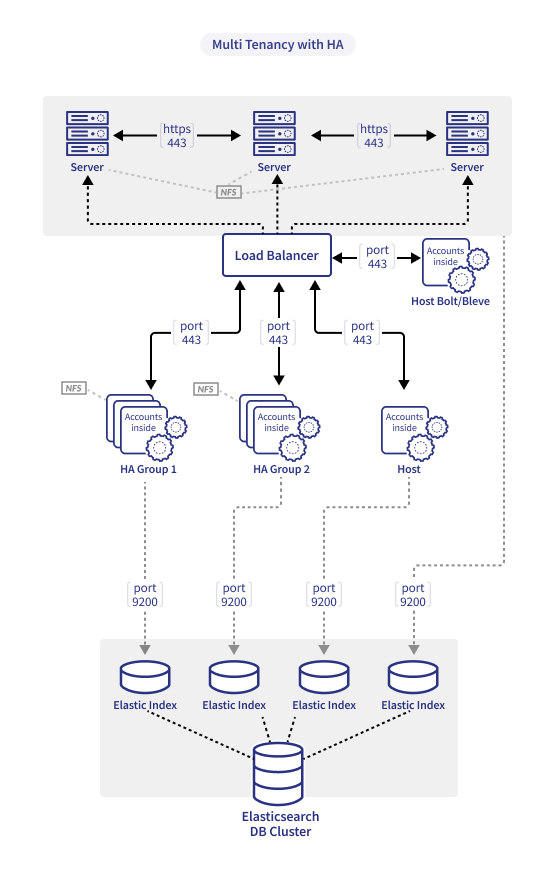
- HA Group is a logical group of multiple host as a cluster. HA Group can provide redundancy and performance improvement by load balancing the request to different member of the HA Group. It's really good, undoubtedly. So no reason why we don't use this feature, even if you have single Host server, it's good to have HA Group in place for the future expansion.

Step 1: If you have only one App Server, you can ignore this step.
This step is for company who has 2+ App servers working in HA by a Load balancer (refer to this architecture guide). The XSOAR Host will connect back to XSOAR Apps by hostname/IP address:443. So in HA deployment, we need to instruct the XSOAR Host to connect to the Load Balancer domain name or IP.
To do this, log in to each of the XSOAR App host > Settings > About > Troubleshooting > Modify the Base URL and External Hostname to your loadbalancer IP sitting in front of the XSOAR Apps.

Step 2: Log in to your XSOAR App server > Settings > Account Management > Host > New Host/HA Group
If you have multiple host under a HA group (for redundancy and load sharing), choose HA Group. Else, choose New Host.

Step 3: Fill in installation information required then click Create and Download Installer
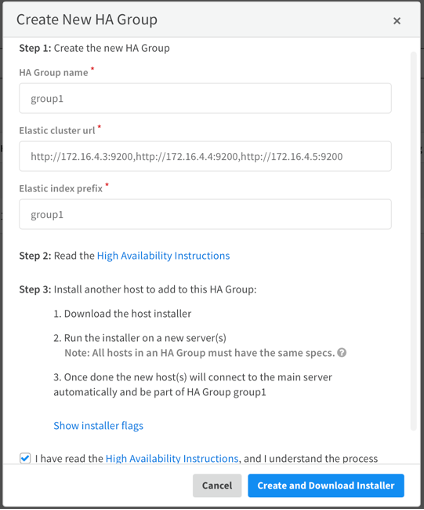
You will get a demisto-xxxx.sh file downloaded to your computer.
Step 4: Install host
- You just need a clean installed Linux server with internet connection and network connection back to your main XSOAR app server (TCP 443).
- But there will be something to prepare as below sub steps if you choose to have multiple Host in the same HA Group.
Step 4.1: Setup NFS client
We need to do this because XSOAR Host server will be NFS client to mount and access shared folder on NFS server.
sudo apt update
sudo apt install nfs-common
Step 4.2: Create /var/lib/demisto folder and mount to NFS
sudo mkdir -p /var/lib/demisto2
sudo mount 172.17.2.7:/var/lib/demisto2 /var/lib/demisto
And check if it’s there
xsoar-app1:~$ df -h
Filesystem Size Used Avail Use% Mounted on
udev 3.9G 0 3.9G 0% /dev
tmpfs 797M 784K 796M 1% /run
/dev/sda1 29G 11G 19G 37% /
tmpfs 3.9G 0 3.9G 0% /dev/shm
tmpfs 5.0M 0 5.0M 0% /run/lock
tmpfs 3.9G 0 3.9G 0% /sys/fs/cgroup
/dev/sda15 105M 6.1M 99M 6% /boot/efi
172.17.2.7:/var/lib/demisto2 29G 6.8G 23G 24% /var/lib/demisto
Step 4.3: now you can install with your .sh file downloaded from Master server
- Then upload the .sh file you got to a new Host server.
- Execute the .sh file to install
chmod +x demisto.sh
sudo ./demisto.sh -- -y
- After the host was installed, it will connect back to XSOAR app server automatically, you don’t need to do anything. If the host belongs to a HA Group, it can be automatically registered under that HA Group as well.
- If you do not see Host registered on XSOAR app server, the issue might be on network connectivity. So check if XSOAR app servers and XSOAR hosts can resolve each other’s hostname (use DNS or edit /etc/hosts file), and also check if any Firewall is blocking the connection between Host and Master server.
Step 5: Verify the Host installation
If everything is put correctly, you can see host under HA group on XSOAR or standalone host if you choose to deploy host before.

If the status is Offline and cannot see other parameter, check your hostname accessibility between the Master server and Hosts.
Also check your Main Hosts tab and you can see 2 XSOAR App that we installed will be shown:

Step 6: Create tenant
There’s a bit confusing here as they do not have Tenant wording in Cortex XSOAR, but it is actually “Account”. So have in mind “Account” is not a user/admin/analyst account, but it is a Tenant.
Go to Account Management > Accounts > Add Account

Then fill in the information. For example, I have a customer named “unit1” and I want to assign resource on HA group1 hosts to process this customer tenant.

Then check your result

After creating accounts, you can switch to different Tenant to manage by clicking the Top left at Main Account.

This ends my series about Cortex XSOAR architecture and installation. Hope you can get the idea of Cortex XSOAR 6.1 architecture and deployment process more clearly via this guide. Happy SOAR!

Comments